With Malcolm Pollock, author of Abracadabra Flute Technique
This is the first of 6 blog posts aimed at teachers of beginner flute players. This series looks at some common challenges and first steps faced by teachers and break them down into simple steps to make teaching technique easy even if the flute is not your first instrument, or you teach a mixed ability group.
Most of my pupils over the years have had problems producing a good sound on the flute. I think it’s true to say that this is THE most important issue for most players (however experienced they may be!)
Obviously, as with any instrument, one aspect of technique will relate directly to other aspects. You can’t make a beautiful tone on the flute if your posture is poor, your articulation is not working properly, and your hands are not holding the flute efficiently. Making sure the flute is in tune with itself (or as in tune as possible) is vital, as is learning to play in tune in different registers and dynamic ranges.
Teaching Embouchure
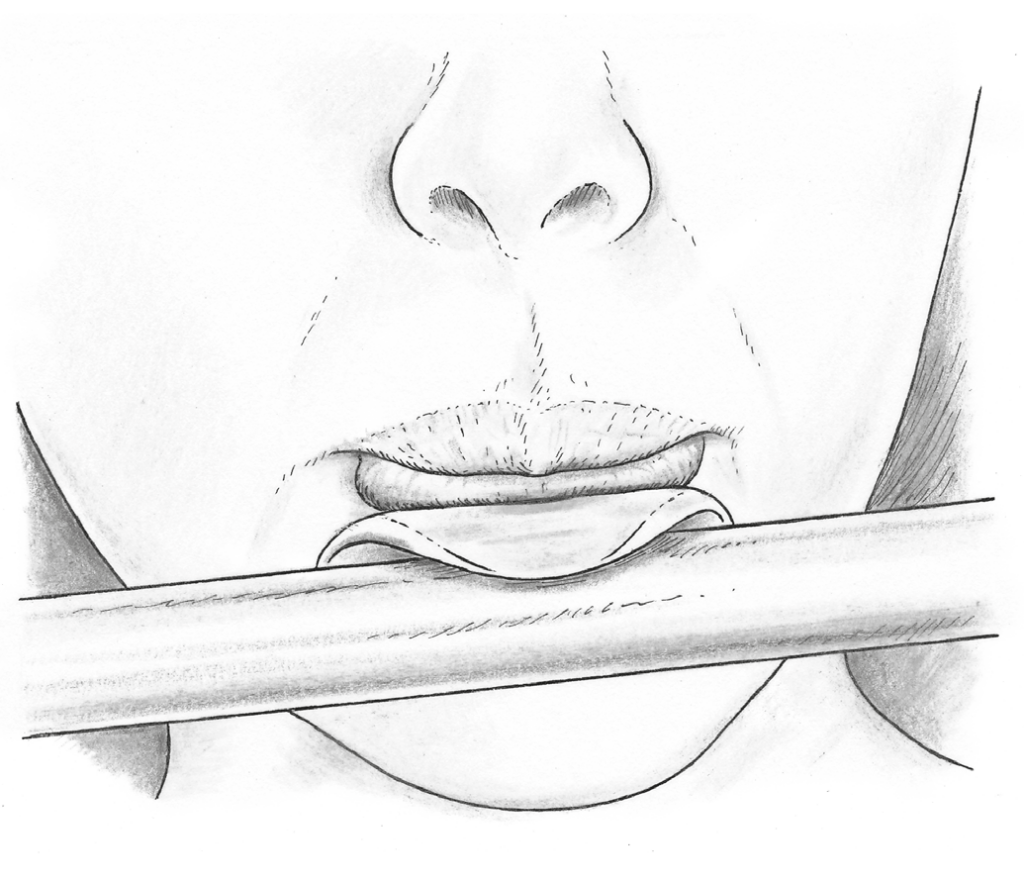
The most important thing is not to rush the opening lessons when it comes to the basics. Obviously, the shape of the lips (“embouchure”) needs to be efficient, so that air only comes through the middle, and the blow hole needs to be placed centrally on the bottom lip, with about a third of it covered.

Step 1.
How the pupil breathes in and out is very important. Without holding the flute, get them to stand straight (but not to attention!) In other words, their shoulders should be relaxed. They should put both hands on their tummy, just below their ribs. When they breathe in they should relax their throat as if they were yawning. The tummy and chest should get bigger. When they breathe out they should apply a gentle pressure from the tummy muscles: the tummy and chest should get smaller.
Step 2.
Now try this exercise without the headjoint. Hold a strip of paper against a wall. Once the pupil has centred their lips, they should breathe in through their mouth, form their “embouchure”, then breathe out evenly. Now take your hand away from the paper. Can the pupil stop the paper falling down and for how long? There are a number of different things being developed here, including the sequence of breathing in correctly and efficiently, forming the embouchure and blowing out. The air must come out at a constant speed in order to maintain the paper in the same place on the wall (and obviously to ensure an even tone).
Step 3.
There will be pressure from the pupil to put the flute together and start to play notes and tunes straight away: don’t give in to this! Starting to get the embouchure and breathing right from lesson one is very important in my experience. Just use the headjoint for the first few lessons so that pupils can concentrate on these things.

There are lots of helpful diagrams, explanations and exercises covering all basic aspects of flute technique in my book: Abracadabra Flute Technique. This is specially designed to act as a companion to Abracadabra Flute but can be used alongside any tutorial method.
Malcolm Pollock has spent a lifetime supporting young musicians through local authority music services, as a teacher, conductor and manager. His last post was the Head of Gloucestershire Music. He was the Chair of the British Flute Society from 2015-2018, and is the author of Abracadabra Flute and Abracadabra Flute Technique.